Showing posts with label How to?. Show all posts

Wednesday, July 22, 2015

Back Street Browser


It is a powerful offline browser. A high-speed, multi-threading website download and viewing program. By making multiple simultaneous server requests, BackStreet Browser can quickly download entire website or part of a site including HTML, graphics, Java Applets, sound and other user definable files, and saves all the files in your hard drive, either in their native format, or as a compressed ZIP file and view offline.
After downloading, all links within the website are reconstructed creating a complete hard drive copy of the site that you can view at your own pace without being connected to the Internet. Additionally, BackStreet Browser provides the option of duplicating the original directory structure of a site making it easy to download and transfer a site to another server.
In the event you lose your Internet connection while downloading a site, the Resume Session allows you to pick up a session where you left off after reestablishing your Internet connection. If you wish to update a previously downloaded site, the Update Session feature allows you to revisit a site using new search parameters to make sure you have the most current files.
In addition to the embedded quick-view browser window in the main program screen, you can launch your default browser for viewing any downloaded projects. The quick-view browser window also supports browsing zipped website, so that you don't need to unzip the files to view.


How to Mass Download Websites using Backstreet Browser

  1. Install Back Street Browser first.


      2.  Open BS Browser and click "New"


3.Paste the required URL.


4.Enter the Title or Name of the Website.


5.Click "OK"

6. It will sutomatically start downloading.


7. Right Click the selected download and click on "Relink all files".


8.Double click the selected link after Relinking the website.


9. Click on "Shell Open". It will open a new browser window with the offline site. 
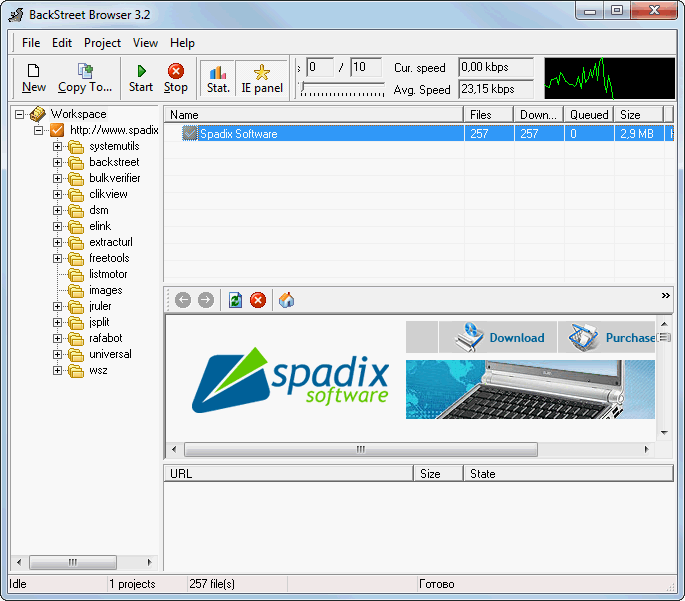
   

                   Back Street Browser
 
It is a powerful offline browser. A high-speed, multi-threading website download and viewing program. By making multiple simultaneous server requests, BackStreet Browser can quickly download entire website or part of a site including HTML, graphics, Java Applets, sound and other user definable files, and saves all the files in your hard drive, either in their native format, or as a compressed ZIP file and view offline.
After downloading, all links within the website are reconstructed creating a complete hard drive copy of the site that you can view at your own pace without being connected to the Internet. Additionally, BackStreet Browser provides the option of duplicating the original directory structure of a site making it easy to download and transfer a site to another server.
In the event you lose your Internet connection while downloading a site, the Resume Session allows you to pick up a session where you left off after reestablishing your Internet connection. If you wish to update a previously downloaded site, the Update Session feature allows you to revisit a site using new search parameters to make sure you have the most current files.
In addition to the embedded quick-view browser window in the main program screen, you can launch your default browser for viewing any downloaded projects. The quick-view browser window also supports browsing zipped website, so that you don't need to unzip the files to view.


How to Mass Download Websites using Backstreet Browser

  1. Install Back Street Browser first.


      2.  Open BS Browser and click "New"


3.Paste the required URL.


4.Enter the Title or Name of the Website.


5.Click "OK"

6. It will sutomatically start downloading.


7. Right Click the selected download and click on "Relink all files".


8.Double click the selected link after Relinking the website.


9. Click on "Shell Open". It will open a new browser window with the offline site. 


Friday, April 10, 2015

Making a Bootable pen drive

4 Steps To Make Bootable USB Pendrive for Windows 8,7,Xp or Any Linux Based OS.

Ever wondered How to make Bootable USB Pen drive ? So that you don’t have to rely on Empty DVD/CD or Rewritable DVD/CD all the time? Well, the best solution for it to make your USB Pen Drive Bootable one  in Just 4 Steps.It will not get damaged or get scratched like DVD and the best thing is pendrive is very compact and handy. Now we are going to see How to make your USB Pen Drive into Bootable OS Pendrive to install Windows or Any Linux Based OS on your PC/Laptops.

Step 1 : Get Your Desired OS in ISO format

Grab your desired Operating System(OS) in ISO format. Get your Favorite OS that is Windows 8 ,Windows 7 ,Windows XP ,Ubuntu or any Linux based OS like FreeBSD,Linux Mint,PC Linux etc,. in ISO format.Generally whenever you download any OS from their official website it will be in ISO format. You can get Windows 8 Operating System(OS) by going to Microsoft Official website.All you need to download Windows 8 OS in Microsoft Website is Microsoft Email id. If you don’t have one you can sign up . After Signing up login with the same id and Go to this link to Download Your Windows 8 OS  choose 32 bit or 64 bit according to your System Configuration.

Step 2 : Get Universal USB Installer Software

After Downloading your desired OS in ISO format ,save it in your PC/Laptop hard disk and then download Universal USB Installer Software in their Official website Here and save it in your Desktop.

Step 3 : Insert and Format the USB Pen-Drive

Now plug the USB Pen drive in your system and format the Pen drive.After Formatting the Pen drive Double Click the Universal USB Installer Software which you saved on your Desktop and Screen will Pop Up click “I Agree”. After that you will be getting the Screen like below

Click the drop down menu and choose Windows 8 Installer,Choose the option according to the OS you downloaded, If your OS is not listed choose Choose “Try Unlisted Linux ISO” . In the above screenshot i selected Windows 8 and after choosing that ,click Browse and locate the Operating System(OS) Image ISO file you have downloaded earlier,Here we are choosing Windows 8 OS Trail ISO .


Step 4 : Bootable USB Pen Drive Ready


Step 4 : Bootable USB Pen Drive Ready


After Choosing the ISO image file,Click “Select Your  USB Flash Drive” and choose your Pen Drive from the list. Now Click Create and  wait until it finishes. After Finishing the process you can use your Pendrive as  BOOTABLE USB PENDRIVE to Install Operating System(OS) on your PC /Laptops.

Thursday, April 9, 2015

USB Flash drive not detected in Windows

External storage devices such as USB Flash drives are commonly used to store and share data across computers. Computers with a Windows operating system (OS) will find their computers generally recognize any such devices automatically. However, there are times scenarios when it may not recognize external hard drives or pen drives and they do not show up in My Computer. This is typically an issue with the Windows OS where the USB ports could have been disabled. The usual solution to this problem is to manually re-enable the USB ports by altering the properties of the relevant registry keys. 

If the laptop does not accept or detect any of the pen drives,memory Cards, then you have to change the registry value in hexadecimal for the computer to accept the USB Drive.

This happens because your USB Drive has been disabled.

 To enable please follow the given following steps.


  • 1. Click Start, then click Run.
  • 2. In the Open box, type regedit then click OK.
  • 3. Locate then click the following registry key:
    • HKEY_LOCAL_MACHINE\SYSTEM\CurrentControlSet\Services\UsbStor
  • 4. In the right pane, double-click Start.
  • 5. In the Value data box, type 3, click Hexadecimal (if it is not already selected) then click OK.
  • 6. Quit Registry Editor.

This method always and should work.

Thursday, March 26, 2015

Download using Utorrent

Downloading Software  using utorrent


Utorrent: Its a peer to peer communication software where files are shared all over the internet.

Step 1: Go to utorrent.com Its the official web page of the software.

Step 2 : Click on "Free Download" link.


Step 3: After downloading the utorrent.exe file, Run the program.
            Install the utorrent software.

Step 4: When installing Click next until the installation completes.

Step 4: Go to torrent search engines like,
             torrentz.com

Step 5: type your software name or the desired application,movie Etc. in the search bar provided.


There will be a continuous links of programms uploaded by different persons.


Step 6: Checkout for the links, the best link or the fastest download speed is determined by the peers.
            So, make sure the no. of peers are higher than the leechers. Leechers slow down your download.

Step 7: Select any one of the download links of the torrent, download the torrent file.

Step 8: It will automatically open in the utorrent application.

 That's all ! You are now downloading your software or movie.

Make sure you type the versions of the software while searching.

 Thank you